Abdullah Şamil Güser
Pods
- Atomic unit of the smallest unit of work of K&s
- Encapsulates an application’s container
- Represents a unit of deployment
- Pods can run one or multiple containers
- Containers within a pod share
- IP address space, mounted volumes
- Containers within a pod can communicate via
- Localhost, IPC
- Pods are ephemeral
- Deploying a pod is an atomic operation, it succeed or not
- If a pod fails, it is replaced with a new one with a shiny new IP address
- You don’t update a pod, you replace it with an updated version
- You scale by adding more pods, not more containers in a pod


Pod Lifecycle
Pod Creation

- When we issue a
kubectl createcommand to deploy a pod in our cluster, the CLI sends the information to the API server - That information will be written into
etcd - The scheduler will watch for this type of information, look at the nodes and find one where to schedule the pod and write that information in
etcd - The
kubeletrunning on the node will watch for that information and issue a command to create an instance of the container inside a pod - Finally the status will be written in
etcd
Pod Deletion

- When you issue a
kubectl deletecommand to delete a pod from your cluster the CLI sends the information to the API server - That information will be written in
etcdand notice that the grace period of 30 seconds will be added - So the
kubeletpicks that information and sends a terminate signal to the container - If the container hangs it is killed after the 30 seconds grace period
- And finally the state is stored in
etcd
Pod State
- Pending : Accepted but not yet created
- Running : Bound to a node
- Succeeded : Exited with status 0
- Failed : All containers exit and at least one exited with non-zero status
- Unknow : Communication issues with the pod
- CrashLoopBackOff : Started, crashed, started again, and then crashed again
Defining and Running Pods
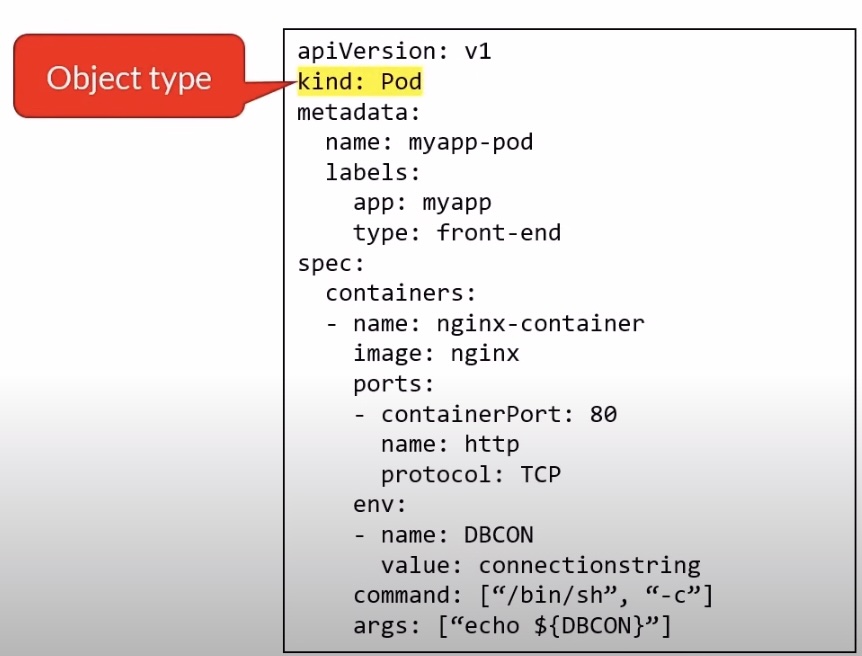
- To define a pod the declarative way you create a yaml file, specifiyin
Podas the kind, that’s the type of resource we want to create - We specify an image location, in this case the nginx image will be pulled from Docker Hub, that’s the default container registry
- We set the port that the container will listen on
- We can add labels, they are used to identify, describe and group related sets of objects and resources
- We can set environment variables directly here, might not be the best idea to place configuration values in a later lecture we’ll see how we can externalize that by the use of a config map object
- We can even specify a command to run when the container starts
kubectl - Pod Cheat Sheet
# Create a pod
kubectl create -f pod-definition.yaml

# Run a pod
kubectl run [podname] --image=busybox -- /bin/sh -c "sleep 3600"

# List the running pods
kubectl get pods

# Same but with more info
kubectl get pods -o wide

# Show pod info
kubectl describe pod [podname]

# Extract the pod definition in YAML and save it to a file
kubectl get pod [podname] -o yaml > file.yaml

# Interactive mode
kubectl exec -it [podname] -- sh

# Delete a pod
kubectl delete -f pod-definition.yaml

# Same using the pod's name
kubectl delete pod [podname]
See L21-04 for more details.
Init Containers
- Let’s say that your app has a dependency on something can be a database an API or some config files you want to initialize or validate that these exist before launching the app
- But you don’t want to clutter your main logic with this type of infrastructure code
- So what do you do you can use an init container that lets you initialize a pod before an application container runs
- Let’s say that for the app container to run it requires a series of configuration files in the Pod definition
- You define a container that will run first
- This is the init container
- Upon completion kubernetes will start the app container
-
This is a great pattern for applications that have dependencies the init container job can be as simple as validating that a service or a database is up and running this keeps the infrastructure code out of the main logic
- They always run to completion
- Each init container must complete successfully before the next one starts
- If it fails, the kubelet repeatedly restarts it until it succeeds
- Unless it’s restartPolicy is set to Never
- Probes are not supported
- livenessProbe, readinessProbe, or startupProbe
See L21-06 for more details.